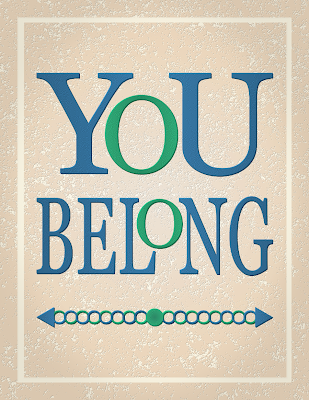
In a previous tutorial, I described a method of creating a background using overlays of various artistic GIMP filter effects. In this tutorial, I'll describe a method of creating a textured background with a 3D look, similar to the one in the following image, using a photo of some gray stone and various functions from the Colors menu combined with Bump Mapping.
Step 1 – Create Two Color Layers
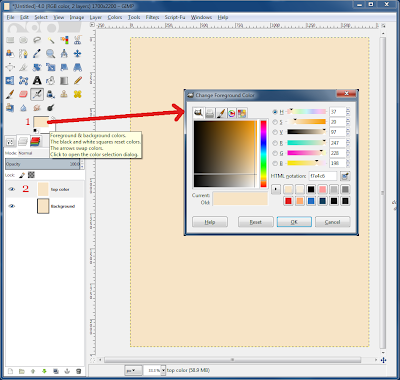
First, invoke GIMP and create a canvas of whatever size you need. Mine is 1700 x 2200 (8.5 x 11 inches at 200 dpi). Change the Foreground color to a color you like [1], then use CTRL+, to fill the canvas with the color. Duplicate the layer and name it “top color” [2].
Step 2 – Create a Texturizing
Layer
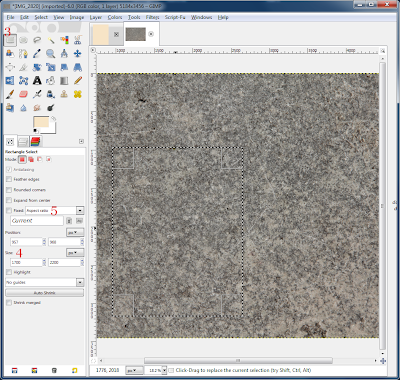
Load the Gray Stone 2820 photo from my Free Images page (or a photo of something that has similar mottled light and dark areas) onto a separate canvas in GIMP. (The quick way to do this is to drag the photo from your desktop or a folder onto the tools area of GIMP.)
Choose the Rectangle Select tool (R) [3] and drag out a rectangle on an interesting area of the photo. To get the proper size easily, enter the width and height of your color canvas in the Size fields [4] of the Rectangle Select tool options dialog. If the selection box is larger than one of the dimensions of the photo, then check the Fixed box [5], leave it on (or select) Aspect ratio, then resize the selection box until it fits conveniently.
Left-click in the middle of the
selection box and drag it around over the image until you like the part of the image that it encloses. Use CTRL+C to copy it.
Go back to the color canvas and use CTRL+V to paste it as a new layer. Double-click on the new layer and name it “texture”. If you had to make your selection smaller than the size of the color canvas, choose Layer > Scale Layer, enter the appropriate Width and Height, then click the Scale button to scale the texture. If the texture does not fill the canvas properly, use the Move tool (M) to get it into position.
Close the canvas containing the photo.
Step 3 – Prepare the Texture for Use as a Selection
Now we need to process the texture photo a bit before we can use it to modify the “top color” layer.
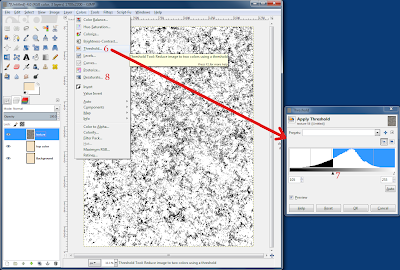
Choose Colors > Threshold [6] and slide the black triangle [7] until you get an interesting mixture of black and white. The black areas will be used to punch holes in the “top color” layer, so make sure there's not too much black.
For a slightly different density of black on white, depending on the photo you're processing, you can use Colors > Desaturate [8] first to convert the photo to grayscale before doing Threshold.
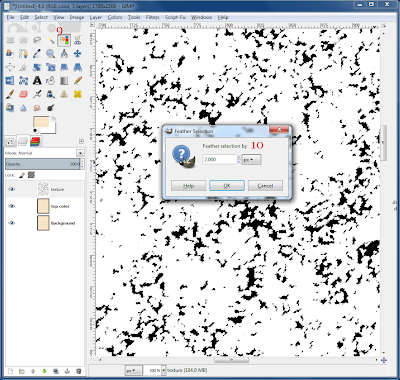
Once you have a black and white texture you like, choose the Select by Color tool [9] and click on one of the black areas. You may need to zoom in (CTRL+Mouse wheel forward) to make sure you're clicking on a black pixel. Then choose Select > Feather and feather the selection by a small number, say 2 or 3 [10]. This will prevent the cutouts that we're going to create in the “top color” layer from having sharp edges.
Step 4 –Modify the Color Layers
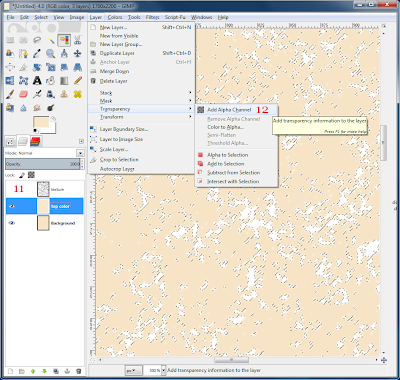
Hide the texture layer by clicking the eyeball next to it [11], then left-click on the “top color” layer to activate it. Hit the Delete key. Oops! We're seeing white. That means this layer has no transparency. Choose Layer > Transparency > Add Alpha Channel [12], then hit the Delete key again.
Use CTRL+SHFT+A to remove the selection.
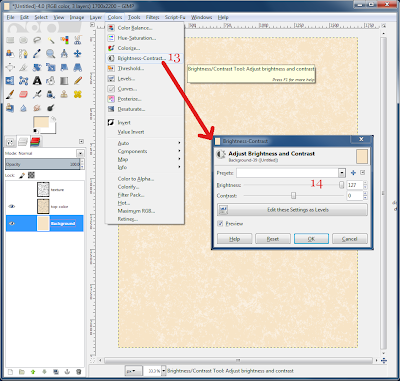
Activate the Background (lowest color) layer and choose Colors > Brightness-Contrast [13]. Turn the brightness up [14] until you can see the lower color shining through the upper color. Since you can move the slider up to only 127, you may have go through a second adjustment. Or you can make the “top color” layer darker.
Step 5 – Create a 3D Effect
To give the “top color” layer a 3D effect, activate it, then choose Filters > Map > Bump Map [15]. In the Bump Map drop-down box [16], make sure the “texture” layer is selected. Set the Depth [17] to 1 or 2, then hit OK. This will add dark and light outlines to the cutouts in the “top color” layer. You can control the direction of the dark and light outlines with the Azimuth slider [18], which can make the cutouts look like either holes (Azimuth 135) or bumps (Azimuth 225). You can also check Invert bumpmap [19] to change the direction of the “height” instead of changing the Azimuth.
Step 6 – Add a Frame
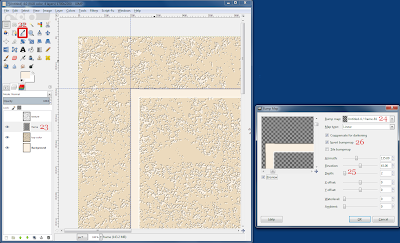
As a final touch for the background, we'll add a carved stripe around the edges to act as a frame.
First we'll need some guides. Zoom in a bit to make alignment easier. Decide how far in you want the frame to
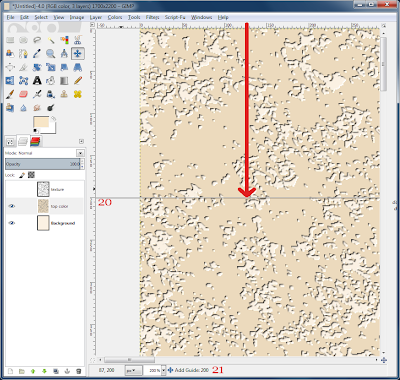
be, then left-click on the top ruler and drag a guide down to the appropriate position. I want my frame to be one inch in from the sides, so I dragged my guide to position 200 [20]. Note that the tool message area at the bottom of the GIMP window shows the guide position [21].
Drag another horizontal guide to the appropriate position near the bottom of the canvas, then drag two
vertical guides from the left ruler to the appropriate left and right positions.
Use CTRL+SHFT+J to zoom out quickly to show the entire canvas.
Now we're going to paint a frame along the guides. Get the color for the frame by activating the Background
layer and using the Color Picker tool [22] to set the Foreground color to the color of the Background layer. Then add a new transparent layer named “frame” above the “top color” layer [23]. Choose the Rectangle Select tool and drag out a selection box around 35 pixels wide that runs along the inside edge
of the left guide, going from the top guide to the bottom guide. Choose Select > Feather and feather the selection by 5 pixels. Use CTRL+, to fill the selection with the Foreground color. Click on the selection box and move it over next to the right-hand guide. Make sure the top and bottom edges are touching the
top and bottom guides correctly. Feather the selection by 5 pixels and fill it with the Foreground color. Drag out a horizontal selection region along the top guide and do the same thing. Repeat along the bottom guide. Remove the selection.
With the “frame” layer still active, choose Filters > Map > Bump Map, set Bump map
to the “frame” layer [24], set Depth to 2 [25], and check Invert bumpmap [26].
You should now have a 3D textured background with an inset frame. Since there are three separate layers, you can use various functions on the Colors menu to change the color of each layer to make any color combination you like. You can remove the guides by choosing Image > Guides > Remove all Guides.


No comments:
Post a Comment