Making the Balloons Pop!
Have you ever wanted to emphasize a particular part of a photo to make it stand out against a busy background? This intermediate-level GIMP tutorial describes a technique whereby you create a zone of color surrounded by a grayscale background to focus attention on the area of interest.
Specifically, I'll describe how to create this image:
from this image:
Step 1 — Crop and Adjust the Image
Load your image into GIMP and use your
favorite cropping and exposure adjustment tools to create a good
framing with nice colors. Also, sharpen the image, if necessary.
It usually takes me several attempts to
get an image adjusted to my liking, so I always duplicate the layer
and work on the copy. That way I can turn the layer visibility on and
off to compare the changes to the original. If I don't like what I
see, I just delete the layer copy, create a new one, and try again.
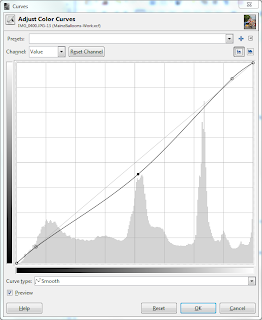
For my balloons image, I used Colors >
Curves to improve the contrast and darken the image a bit.
Once you have your image adjusted to
your liking, name the new layer “adjusted”.
For information on
For information on
- Cropping, see GIMP 2.8 Tutorial: Which Tool Should I Use to Crop a Photo? — Conclusion.
- Sharpening, see A Non-Destructive Adjustable Way to Sharpen a Photo.
- The Curves tool, see Pat David's excellent article Getting Around in GIMP - Color Curves Toning/Grading.
Step 2 — Cut Out the Focal Point
This step will probably take the
longest. To create a color zone against a grayscale background, it's
necessary to cut out the area you want to keep in color. Duplicate
the “adjusted” layer and name the new layer “cutout” [1].
Make sure the cutout layer has an alpha channel by selecting Layer >
Transparency > Add Alpha Channel [2]. Hide your other layers by
turning off the eyeball next to them in the Layers list [3]. Then,
using an appropriate trimming technique, which could involve any one
or more of the various Select tools or a layer mask, cut the focal
point out of the background.
I tend to use the Free Select tool [4]
most of the time since this tool makes it easy to be very precise
about where the cut lines are. For information on using the Free Select tool, see GIMP 2.8 Tutorial: Which Tool Should I Use to Cut Out an Irregular Image?
Step 3 — Create the Grayscale Background
To create a
grayscale background, duplicate the “adjusted” layer
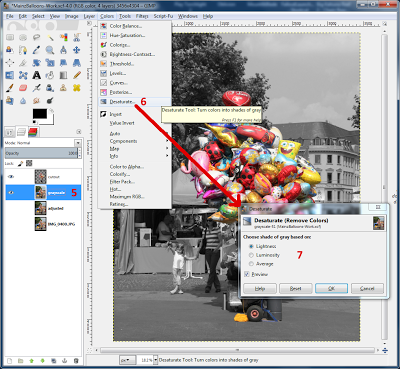
again and name the new layer “grayscale” [5]. Make the
“grayscale” layer visible and make sure it is below the “cutout”
layer. Choose Colors > Desaturate [6] and select one of Lightness,
Luminosity, or Average [7], depending on what looks best with your
image. I chose Lightness.
You now have a colored focal point
against a grayscale image. You may be tempted to stop here if you're
happy with the way your image looks, but there are a few other
techniques you can use to make the image a bit more interesting.
Step 4 — Create a Shadow Outline
To set the focal point off from the
background a bit more, you can add a fuzzy black shadow around the
perimeter. Duplicate the “cutout” layer and name it “shadow”.
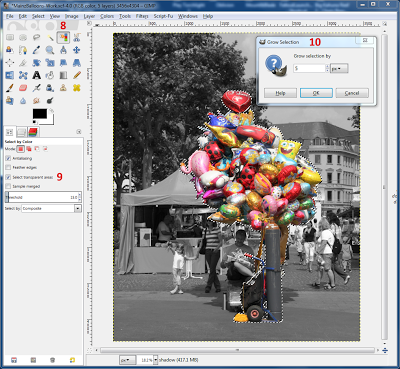
Select the Select by Color tool [8] and make sure that Select
transparent areas is ticked in the Tool Options dialog [9]. Click
outside of the colored area on the “shadow” layer to select the
transparent background, then press CTRL+I to invert the selection.
Make the selection area a little larger by choosing Select > Grow
and entering a small number [10]. I chose 5 pixels.
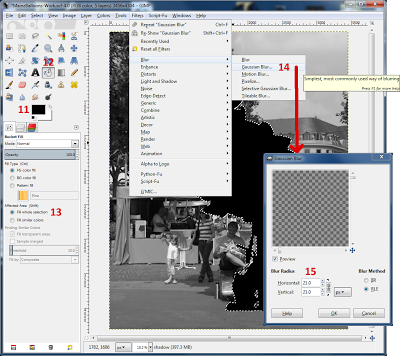
Make the Foreground color black [11],
then select the Bucket Fill tool [12], choose Fill whole
selection in the Tool Options dialog [13], and fill the selection
area with black. Use CTRL+SHFT+A to remove the selection, then choose
Filters > Blur > Gaussian Blur [14] and enter a low number,
like 21, to blur the edges of the shadow a bit [15]. Slide the
“shadow” layer below the “cutout” layer.
Your image might look better with a
white shadow. With the “shadow” layer active, choose Colors >
Invert to change the black shadow to white.
Step 5 — Tint the Background
To make the background a little more
interesting so that it's not just flat gray, you can add a color
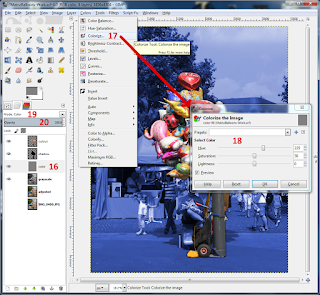
cast. Create a new layer named “color” and fill it with medium
gray [16]. Slide the “color” layer to just above the “grayscale”
layer. With the “color” layer active, choose Colors > Colorize
[17] and change the settings until you find a color that complements
the focus area nicely [18]. After applying the color, change the
Mode of the “color” layer to Color [19] and adjust the Opacity
[20] to a low number to give just a hint of color to the background.
Conclusion
This technique can be used to create a
lot of fun images. Instead of making just one focal point, you could,
with the right sort of image, create several separate focal points or
pull just one or two colors out of an image. The possibilities are
endless.
Acknowledgement
I was inspired to create this tutorial
after reading an article called The WOW! Factor–Focusing with Color by Jack Davis and
Linnea Dayton in the January/February 2004 issue of Photoshop User.



No comments:
Post a Comment